Check in, check out, and renewing
Daily Task
Checking out
From the Check Out (Circulation Desk) function, scan the patron barcode.
Scan the item barcodes. As each item is scanned, a line will appear in the bottom half of the screen with the item barcode, the title and the due date. The item is now checked out. If a patron changes their mind and doesn’t want an item, there is no way to remove it from the list. You must finish the transaction and check that item back in.
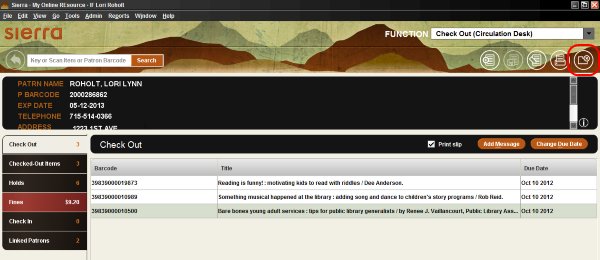
When all items have been scanned, click Close. It prints out the due date slip, and finishes the transaction.
If you need to change the due date, before Close, click Change Due Date.
If the patron does not want a due date slip, uncheck the Print slip box, then click Close. You must re-check the box afterwards, or the next patron won’t get a slip.
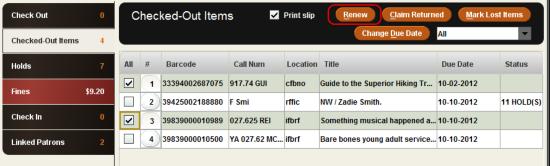
The due date slip prints out only what is being checked out during the present transaction. If the patrons wants a list of everything they have checked out, click on the Checked-Out Items tab, and click the Print icon in the upper right corner. (This can be done for all of the tabs.)
Checking In
Select the Check-In (No Patron) from the upper-right Function dropdown.

NOTE: All AV items must be checked for parts BEFORE checking in.
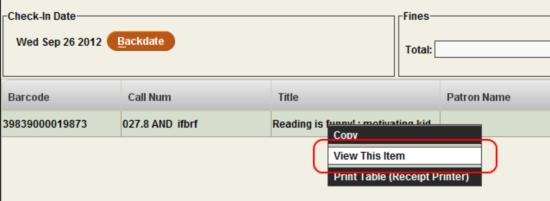
If you are checking in items from the book drop and need to have a past date as their check-in date, click the Backdate button; a calendar will pop up. Click the date you want to use as the checkin date. This date will be good until you click Close; then it will revert back to today’s date. Backdating is also used in the rare event the system goes down. No check-in is done while the system is down. When it comes back up and items need to be checked in, should the outage have lasted overnight you would back date all checkins to the date the system went down.
Scan the barcodes of the items you are checking in. For each item a line will appear on the bottom half of the screen listing the barcode number, the call number, the title, the patron name, amount due (if any) and status (such as the number of days overdue).
Pay attention to any pop-up messages. If an item is on hold, you will be asked to fill the hold. If the item was missing, you will be asked if you want to clear it. If the item was billed, you will be alerted to that fact. You must keep one eye on the screen as you are scanning, because if a message does pop up, nothing else you do will “take” until you acknowledge the message. If you are scanning in 20 items and a message pops up on number 3 and you don’t notice, the other 17 scans won’t be entered. Once you do notice and take care of the message, you will have to scan those 17 items in again. If you have speakers on your circ stations, sounds can be set to alert you when a message pops up.
When all items have been scanned, click Close. This is very important! It finishes the transaction and clears all the records. Never walk away from the screen without closing first! Not only is there a potential for violating patron privacy (names are on the screen for all the world to see), but as long as records are visible on the screen, the check-in may not be complete.
Viewing an item record at check-in
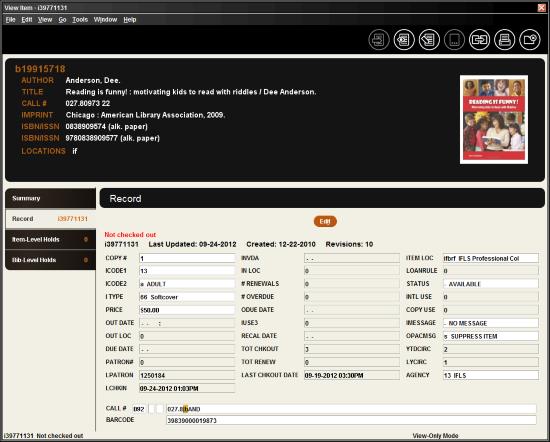
Should you need to view a record at checkin, highlight the line the record is on, right-click, and click View this item.
The item record will open.
Renewing
When you get a request from a patron to renew items, either when they are at the desk or over the phone, scan the patron barcode or type in their name to bring up their record.
Tip: Click on the Due Date column header to sort the list by due date so you can easily see what is close to being due.
Click on the Checked-out Items tab.
Click the box in front of the item(s) to be renewed.
Click Renew.
If the item cannot be renewed, a window will pop-up telling you the reason.
- “Too many Renewals” means that item has already been renewed twice, the maximum allowed in MORE.
- “Title is on hold for another patron”. If an item has holds, it cannot be renewed unless there are freely-circulating available copies
The pop-up window will give the option to override the block.
- Overriding the block is not allowed on items that have holds, unless there are also freely-circulating available copies. Note that Rental and Lucky Day items are not freely-circulating copies and should not be taken into account when deciding whether or not to override and renew. We have a responsibility not to delay access to those patrons that are waiting for high-demand items.
- Overriding the number of renewals can be done on rare occasions when you are working earnestly with a patron to resolve an issue of a lost or missing item or part. Allowing a third renewal to help resolve the issue is understandable. Anything beyond that is not permitted and violations are subject to the MORE Staff Abuse Policy.
If a patron hands you an item and asks you to renew it, you can quickly do this by going to the Renew (No Patron) function from the upper-right dropdown and scanning the barcode. The item will be renewed if eligible, and a new due date slip will print if the “Print slip” box is checked.
Changing due dates
Very occasionally you may need to change the due date for a patron, for example to cover a known book club meeting or school assignment. Please keep in mind:
- Rather than changing due dates, staff should encourage patrons to renew, or renew on their behalf whenever possible
- Staff have more leeway on extending due dates on items your library owns; check with the owning library before extending loan periods more than a few days
- Be mindful of outstanding holds and make only short adjustments to due dates in extenuating circumstances when the item could fill a hold
You can extend a due date either at the time items are checked out, or you can change the due date on a particular item after it is checked out. Please note: changing a due date for an item after it has been checked out and the initial transaction completed counts as a renewal for that item.
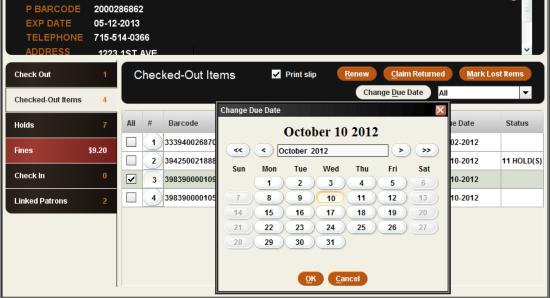
To extend a due date during check-out, after the first item is scanned, click on the Change Due Date button. A calendar will pop-up. Click on the new due date. If you want to use the same due date for the rest of the patron’s items, be sure to check the box by “Use this date in rest of check-outs for this patron.” Click on the OK button. This change is valid only for this patron. Once you close, this date is cleared.
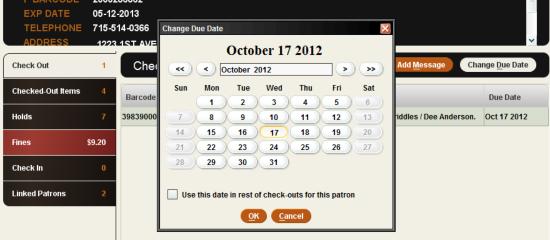
To change the due date of a checked-out item (which counts as a renewal), select the Check Out (Circulation Desk) function and bring up the patron’s record. Click on Checked-Out Items on the left, then highlight the item to be changed. Click on the Change Due Date button. The calendar will appear. Select the new due date. Click OK. If more than one item needs to be changed, you’ll need to change them one at a time.