Item Records
Searching for a matching record
The first step in adding an item to the MORE database is to search the database for a matching record. The most direct way to do this is to search by ISBN (or UPC if working with an AV item). If no match is found, try searching by title.
If an item is the same between the covers it can use the same bib record; paperback editions can be added to the hardcover record and reprints with different ISBNs can be added to the same bib record. New records will be created for books with new illustrations, new translations, narrators (for audiobooks), forewords, after words, added chapters, bonus short stories, new introductions, and bonus epilogues. Records will be merged for books that have excerpts for other books, movie tie-ins (only if pictures from the movie are the only addition to the book), Readers Guides, author interviews, different ISBNs (as long as the content is the same with a 935 note saying content was verified).
For clarification as to when a 935 note can be used, please review the 935 Note documentation.
Special and Anniversary editions often have additional features that are not found in the first edition. These records should not be merged if the new edition includes more than a simple reader’s guide or a sneak peek. These additional features must be written out in a 500 note for clarification and to distinguish this edition from all others.
Items that include a foreword or an afterword should have a 500 note added to the record, listing both the author and date as shown in the book. Occasionally the actual title of an item is not clear; in this case it can be helpful to search by author to see how it is entered if an ISBN match is not found. In the case of DVDs, often movies are re-released by different distributors, especially in the case of older films. If the movie is the same, same actors, same length (within a couple minutes), same attributes (a colorized version of an original black and white film is NOT the same) and any bonus features are the same they can go on the same record. For audiobooks on CD, the narrator and number of discs must match. Time can vary up to 30 minutes as different publishers can have longer pauses between tracks. If there is a different narrator, different number of discs (even if the length is the same) or any added material such as an author interview, a new bib record is required.
Attaching new items
- Search for the bibliographic record using the methods discussed under “Search for a Matching Record.”
- Once you have found the bibliographic record you wish to attach to, select the Summary icon.
- Then select Attach New Item.
- A pop-up box will appear for the IType. Select the type that reflects your item. Click on Next.
- A pop-up box will appear for the PRICE. Enter the price of your item. Click on Next.
- A pop-up box will appear for the CALL #. Enter the call number you wish to use for your item. Click on Next.
- A pop-up box will appear for the BARCODE. Scan or type in the barcode of your item. Click on Next.
- PLEASE NOTE: the prompts may not be the same in all of the item templates. These examples above are the very basic prompts. Your prompts may be different.
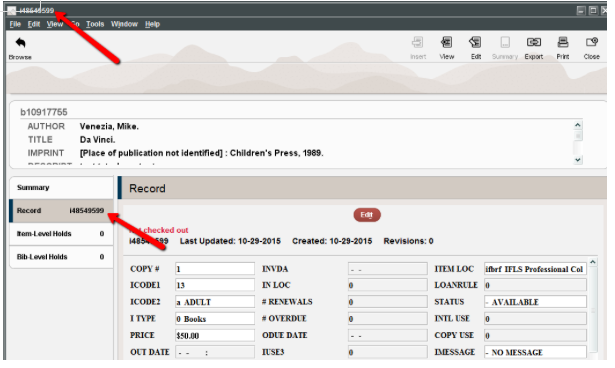
- The New Item will appear. The two arrows indicate that this is a New item. The arrows indicate that New Item has been replaced with the new item record number.

- Click on the Save icon.
- When the item record is Saved, an item record number will be assigned to it.
- You can go through the item record to be sure you’ve enterd in the correct information. You can make any changes if needed.
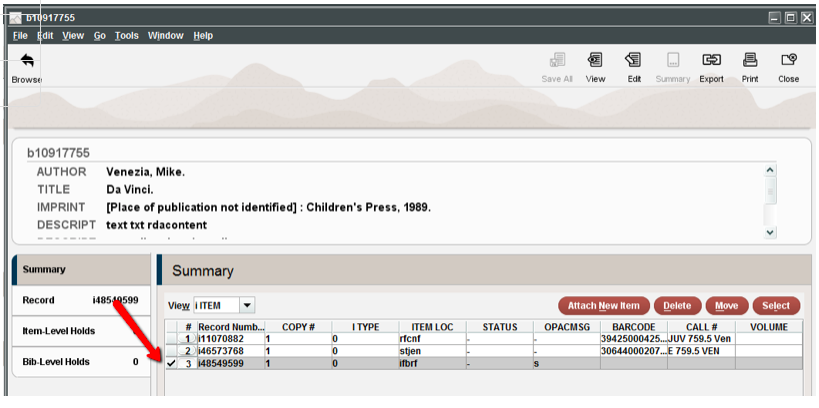
- By clicking on Summary, you can view your item record as well as any others that are attached to this bib record. The red arrow shows your new item record.
Creating call numbers
The most important consideration when assigning call numbers is ease of finding for patrons and staff, and co-locating similar materials. The specific call number used by your library is a local decision.
Fiction: 099
Fiction call numbers use the MARC tag 099 and consist of a letter or letters to designate the section (F for fiction, J for juvenile, DVD for movies, etc) and letters for author or title. It looks like this in an item record:
![]()
Non-fiction: 092
Non-fiction call numbers use the MARC tag 092 and the different parts of the call number are separated by what we call subfields. There is a |b between the Dewey number and the author letters for adult non-fiction books like this:
![]()
The template will have just the |b in this box; click before the |b to enter the Dewey number and click after it to add the author letters.
Non-fiction call numbers that have letters in front of the Dewey number to designate a different collection (J, DVD, LP) are in a |f, then |a for the number, then the |b for the author letters like this:
![]()
Item record templates will have the |f with the letters that belong there then the |a and the |b so you can insert the cursor after |a to insert the Dewey number and then insert the cursor after the |b for the letters. When this field pops up it should look like this for a non-fiction template:
![]()
It takes practice to click in after the a and get the cursor in the right place; you can use your arrow keys to move the cursor to the correct place.
Assigning Dewey (DDC) call numbers
While the call number used by your library is a local decision, here are some possible sources for likely Dewey call numbers:
- The 082 field in the title/bibliographic record
- Other MORE member libraries’ call numbers, as found in Sierra or the MORE Catalogs. Tip: the MORE Classic Catalog shows call numbers in search results lists
- Other libraries’ catalogs. Multnomah County Library, Milwaukee County libraries, New York Public Library, and many others use DDC
- MORE has limited access to OCLC’s WebDewey tool. Submit an IFLS help desk ticket to access this resource for tricky situations
Printing spine labels
To set up your workstation for printing spine labels, you must first turn on the print templates.
- Go to Admin-Settings.
- Click on the Print Templates tab.
- Change the Output type to Spine Label, and check the box in front of Use Print Templates.
- From the list on the right, move over the templates for the labels you want to use to the left side so they are under Preferred templates.
The recommended templates are:
- Master Label for all should take care of 95% of all labels you need to print.
- MasterLP Master with large font prints call numbers in large type.
- MasterLong Master for longer names moves the left margin over; for use in libraries where the author’s last name is spelled out.
- Single nf split2 is for non-fiction call numbers with the Dewey number split on two lines – the first three numbers on one line and any following numbers on the second line. For example:
J J 818.54 818 AMO .54 AMO (labelnfwh) (labelspl2)
- Click Save Settings.
- Under File – Select Printer, click on Print Templates.
- Change the Output type to Spine label and click Print.
- Click the drop down box for printer name and select the Zebra printer you will be using for the labels.
- Click the box in front of Save this printer selection.
- Click Print.
Set up is complete. TO PRINT LABELS:
- From Admin – Settings, click on the Print Templates tab.
- At the bottom of the screen, in the Select Template box, click the drop down arrow and select the template you want to use.
- Click Save Settings.
- After you create an item record, and SAVED IT, type Ctrl L to send the spine label to the printer. You can also click Tools – Print Spine Label.
- NOTE: You must save the item record before the spine label will print!
Deleting item records
- Search for the item record.
- In the item record, go to the File menu and select File>Delete Item record.
- A Delete Record(s) pop-up dialog box will appear. Select Yes to delete the record or No to return to the item record.

- Close the record by either: clicking the Close icon, Alt+Q, or selecting File>Close.
- If your item happens to be the last item on the bib record:
- A pop up box will come up asking if you want to delete the bib record as well. Click on Yes.
- If the bib record can’t be deleted–usually because the catcode = x–no further action is necessary. IFLS staff regularly delete these records and update holdings in OCLC as needed.